C++软光栅渲染器实现思路 前言 学了一段时间图形学,是时候整个渲染器了,优先考虑实现,次要考虑优化。
使用GLFW 创建窗口和绘制像素点、使用Eigen 提供线性代数数学库、使用OBJ-Loader 解析obj文件
才疏学浅、漏洞百出、请多指教
工程链接:https://github.com/Pditine/PurpleFlowerRenderer
视频演示:https://www.bilibili.com/video/BV1Jy411i73D/?vd_source=4ec457bb4f6cbb496da2800adbe93b46
数据结构 物体和三角形 物体是由三角形组成的、三角形由三个顶点组成,我们首先定义三角形和物体的数据结构
1 2 3 4 5 6 7 8 9 10 11 12 13 14 15 16 17 18 19 20 21 22 23 24 25 26 27 28 29 30 31 32 33 34 35 36 37 38 39 40 41 42 43 44 45 46 47 48 49 50 51 52 53 54 55 56 57 58 59 60 61 62 63 64 65 66 67 68 69 70 71 72 73 #pragma once #include <Eigen> using namespace Eigen;class Triangle { public : Vector4f vertex[3 ]; Vector4f worldVertex[3 ]; Vector4f normal[3 ]; Vector2f uv[3 ]; Vector3f color[3 ]; Triangle () { vertex[0 ] << 0 , 0 , 0 , 1 ; vertex[1 ] << 0 , 0 , 0 , 1 ; vertex[2 ] << 0 , 0 , 0 , 1 ; color[0 ] << 0 , 0 , 0 ; color[1 ] << 0 , 0 , 0 ; color[2 ] << 0 , 0 , 0 ; } void SetVertex (const Vector3f& v0, const Vector3f& v1, const Vector3f& v2) { vertex[0 ] = Vector4f (v0.x (), v0.y (), v0.z (), 1.0f ); vertex[1 ] = Vector4f (v1.x (), v1.y (), v1.z (), 1.0f ); vertex[2 ] = Vector4f (v2.x (), v2.y (), v2.z (), 1.0f ); } void SetVertex (const int & i, const Vector3f& ver) { vertex[i] = Vector4f (ver.x (), ver.y (), ver.z (), 1.f ); } void SetColor (const Vector3f& c0, const Vector3f& c1, const Vector3f& c2) { color[0 ] = c0; color[1 ] = c1; color[2 ] = c2; } void SetColor (const int & i, const Vector3f& col) { color[i] = col; } void SetNormal (const Vector4f& n0, const Vector4f& n1, const Vector4f& n2) { normal[0 ] = n0; normal[1 ] = n0; normal[2 ] = n0; } void SetNormal (const int & i, const Vector4f& n) { normal[i] = Vector4f (n.x (), n.y (), n.z (), 1.f ); } void SetUV (const Vector2f& uv0, const Vector2f& uv1, const Vector2f& uv2) { uv[0 ] = uv0; uv[1 ] = uv1; uv[2 ] = uv2; } void SetUV (const int & i, const Vector2f& tC) { uv[i] = tC; } };
1 2 3 4 5 6 7 8 9 10 11 12 13 14 15 #pragma once #include "Triangle.h" class Shader ;struct Object { Vector3f Position; Vector3f Rotation; Vector3f Scale; std::vector<Triangle> Mesh; Shader* Shader; };
相机和灯光 然后定义摄像机和灯光,这里的灯光是方向光
1 2 3 4 5 6 7 8 9 10 11 12 13 #pragma once #include <Eigen> using namespace Eigen;struct Camera { Vector4f Position; Vector3f Up; Vector3f Direction; float Fov; float Near; float Far; float AspectRatio; };
灯的定义中有关于ShadowMap的部分,这部分会在之后 说
1 2 3 4 5 6 7 8 9 10 11 12 13 14 15 16 17 18 19 20 21 #pragma once #include <Eigen> #include <iostream> #include "Object.h" #include <vector> #include "Renderer.h" using namespace Eigen;struct Light { Vector3f Direction; Vector3f Color; float Intensity; Vector4f Position; int ShadowMapWidth; int ShadowMapHeight; Camera VirtualCamera; std::vector<float > ShadowMap; };
Shader 然后定义着色器,严格的来说是片元着色器
1 2 3 4 5 6 7 8 9 10 11 12 13 14 15 16 17 18 19 20 21 22 23 24 #include "Camera.h" #include "iostream" #include "Texture.h" struct Object ;using namespace Eigen;struct FragmentData { Object* object; Vector4f viewportPos; Vector4f worldPos; Vector3f color; Vector4f normal; Vector2f uv; }; class Shader { public : virtual Vector3f GetColor (const FragmentData& data) 0 ; };
渲染器 为了将三维的物体渲染到二维平面上,我们首先需要将物体进行一系列坐标空间的变换,也就是局部空间转世界空间转观察空间转裁剪空间转屏幕空间 (QAQ)
我们将需要的渲染器功能先声明好,之后我会逐一解释
1 2 3 4 5 6 7 8 9 10 11 12 13 14 15 16 17 18 19 20 21 22 23 24 25 26 27 28 29 30 31 32 33 34 35 36 37 38 39 40 41 42 43 44 45 46 47 48 49 50 51 52 53 54 55 56 57 58 59 #pragma once #include "Object.h" #include "Camera.h" constexpr float PI = 3.1415926f ;class Texture ;class Renderer { private : int _width, _height; Matrix4f _viewport; std::vector<Vector3f> _frameBuffer; std::vector<float > _zBuffer; public : Matrix4f GetViewport () ; std::vector<float >& GetZBuffer () ; Eigen::Vector3f& GetPixelColor (int x,int y) ; std::vector<Vector3f>& GetFrameBuffer () ; Renderer (int w, int h); void Clear () void Clear (Texture* background) int GetPixelIndex (int x, int y) static Matrix4f GetModelMatrix (const Object& o) static Matrix4f GetViewMatrix (const Camera& c) static Matrix4f GetClipMatrix (const Camera& c) void VertexShader (std::vector<Object>& objectList, Camera& c) static bool InsideTriangle (const float x, const float y, const Triangle& t) static std::tuple<float , float , float > Barycentric (float x, float y, const Vector4f* v) static Vector2f Interpolate (float alpha, float beta, float gamma, const Vector2f& vert1, const Vector2f& vert2, const Vector2f& vert3) static Vector3f Interpolate (float alpha, float beta, float gamma, const Vector3f& vert1, const Vector3f& vert2, const Vector3f& vert3) static Vector4f Interpolate (float alpha, float beta, float gamma, const Vector4f& vert1, const Vector4f& vert2, const Vector4f& vert3) static float Interpolate (float alpha, float beta, float gamma, const float & vert1, const float & vert2, const float & vert3) void SetPixelColor (int x,int y, const Vector3f color) void FragmentShader (std::vector<Object>& objects) };
1 2 3 4 5 6 7 8 9 10 11 12 13 14 15 Renderer::Renderer (int w, int h) :_width(w), _height(h) { _frameBuffer.resize (w * h); _zBuffer.resize (w * h); _viewport << _width / 2 , 0 , 0 , _width / 2 , 0 , _height / 2 , 0 , _height / 2 , 0 , 0 , 1 , 0 , 0 , 0 , 0 , 1 ; } void Renderer::Clear () std::fill (_frameBuffer.begin (), _frameBuffer.end (), Vector3f (173.0f /255 , 216.0f /255 , 230.0f /255 )); std::fill (_zBuffer.begin (), _zBuffer.end (), std::numeric_limits<float >::infinity ()); }
有了这些准备,我们就可以实现最基本的光栅化渲染了
渲染管线 使用其次坐标乘转换矩阵的方式实现坐标空间转换
局部转世界 为了获得模型矩阵,我们将物体的旋转拆分成三个方向的分别旋转,最后再与平移和缩放矩阵相乘
注意平移会改变旋转中心的位置,一定要最后左乘
1
2
3
4
5
6
7
8
9
10
11
12
13
14
15
16
17
18
19
20
21
22
23
24
25
26
27
28
29
30
31
32
33
34
35
36
37
38
Matrix4f Renderer::GetModelMatrix (const Object& o) Matrix4f rX, rY, rZ; float radX, radY, radZ; Matrix4f scale; Matrix4f move; radX = ToRadian (o.Rotation.x ()); radY = ToRadian (o.Rotation.y ()); radZ = ToRadian (o.Rotation.z ()); rX << 1 , 0 , 0 , 0 , 0 , cos (radX), -sin (radX), 0 , 0 , sin (radX), cos (radX), 0 , 0 , 0 , 0 , 1 ; rY << cos (radY), 0 , sin (radY), 0 , 0 , 1 , 0 , 0 , -sin (radY), 0 , cos (radY), 0 , 0 , 0 , 0 , 1 ; rZ << cos (radZ), -sin (radZ), 0 , 0 , sin (radZ), cos (radZ), 0 , 0 , 0 , 0 , 1 , 0 , 0 , 0 , 0 , 1 ; scale << o.Scale.x (), 0 , 0 , 0 , 0 , o.Scale.y (), 0 , 0 , 0 , 0 , o.Scale.z (), 0 , 0 , 0 , 0 , 1 ; move << 1 , 0 , 0 , o.Position.x (), 0 , 1 , 0 , o.Position.y (), 0 , 0 , 1 , o.Position.z (), 0 , 0 , 0 , 1 ; return move * rZ * rX * rY * scale; }
世界转观察 实际上,相机也是一个物体,而相机的局部空间是被我们所关注的,所以相机的局部空间叫观察空间
为了获得观察矩阵,我们先获得相机移至原点的平移矩阵
然后,为了使物体的旋转转换到观察空间,我们需要获得相机当前旋转状态的逆矩阵
尘封已久的线性代数知识登场,我们知道旋转矩阵是一个正交矩阵,而正交矩阵的逆就是其本身的转置,我们为了获得相机当前旋转状态的逆矩阵,我们只需要获得相机当前旋转状态的转置
1
2
3
4
5
6
7
8
9
10
11
12
13
14
15
16
17
18
19
20
21
Matrix4f Renderer::GetViewMatrix (const Camera& c) Matrix4f move; Vector3f right; Matrix4f rotateT; move << 1 , 0 , 0 , -c.Position.x (), 0 , 1 , 0 , -c.Position.y (), 0 , 0 , 1 , -c.Position.z (), 0 , 0 , 0 , 1 ; right = c.Direction.cross (c.Up); rotateT << right.x (), right.y (), right.z (), 0 , c.Up.x (), c.Up.y (), c.Up.z (), 0 , -c.Direction.x (), -c.Direction.y (), -c.Direction.z (), 0 , 0 , 0 , 0 , 1 ; return rotateT * move; }
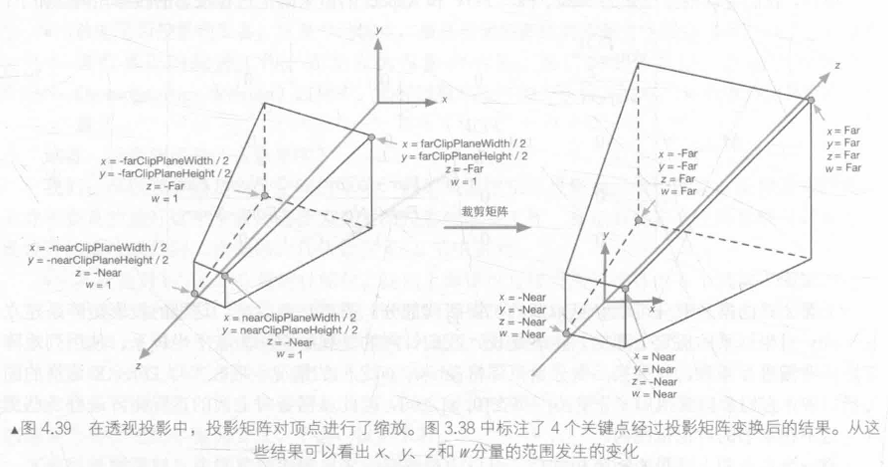
观察转裁剪 裁剪矩阵分为透视投影矩阵和正交投影矩阵,我这里用的是透视投影
插图来源于《UnityShader入门精要-冯乐乐》
1
2
3
4
5
6
7
8
9
10
11
12
13
14
Matrix4f Renderer::GetClipMatrix (const Camera& c) float radFov; Matrix4f frustum; radFov = ToRadian (c.Fov); frustum << 1 / (c.AspectRatio * tan (radFov / 2 )), 0 , 0 , 0 , 0 , 1 / tan (radFov / 2 ), 0 , 0 , 0 , 0 , -(c.Far + c.Near) / (c.Far - c.Near), -(2 * c.Far * c.Near) / (c.Far - c.Near), 0 , 0 , -1 , 0 ; return frustum; }
如果一个顶点在相机的视锥体内,应该满足-w<=x<=w&&-w<=y<=w&&-w<=z<=w,不满足的片元应该被剔除掉
裁剪转屏幕 我们要给坐标做一个齐次除法,也就是把xyz的值除以w,此时视锥体会被压成一个立方体
然后我们要使xy坐标映射屏幕上的点,转换矩阵已经在上文中渲染器 的构造函数中给出
我的渲染器中实际的裁剪空间转屏幕空间的步骤在定点着色中执行
顶点着色 正常这一步应该有为顶点着色的功能,反正unity有,我这里只有将顶点的坐标空间变换,为片元着色做准备
1
2
3
4
5
6
7
8
9
10
11
12
13
14
15
16
17
18
19
20
21
22
23
24
25
26
27
28
29
30
31
32
33
34
35
36
37
void Renderer::VertexShader (std::vector<Object>& objectList, Camera& c) Matrix4f mvp; for (Object& object : objectList) { mvp = GetClipMatrix (c) * GetViewMatrix (c) * GetModelMatrix (object); for (Triangle& t : object.Mesh) { for (int i = 0 ;i<3 ;i++) { t.worldVertex[i] = GetModelMatrix (object)* t.vertex[i]; } for (auto & vec : t.vertex) { vec = mvp * vec; vec.x () /= vec.w (); vec.y () /= vec.w (); vec.z () /= vec.w (); vec.w () /= vec.w (); vec = _viewport * vec; } } } return ; }
片元着色 片元着色之前,我们需要先实现一些必要的操作
检查片元是否在三角形中 逐三角形操作时,只有在三角形中的点才能进入到后续的渲染流程中
我们将要检查的点与三角形的三个点连接成向量,并与三角形的三个边组成的向量分别叉乘,如果得到的向量方向相同,则说明点在三角形内部,反之在三角形外部
1
2
3
4
5
6
7
8
9
10
11
12
13
14
15
16
17
18
19
20
21
22
23
24
25
26
27
28
29
30
31
32
33
34
35
36
bool Renderer::InsideTriangle (const float x, const float y, const Triangle& t) Vector3f v[3 ] = { Vector3f (t.vertex[0 ].x (),t.vertex[0 ].y (),1.f ), Vector3f (t.vertex[1 ].x (),t.vertex[1 ].y (),1.f ), Vector3f (t.vertex[2 ].x (),t.vertex[2 ].y (),1.f ) }; Vector3f p (x, y, 1 ) ; Vector3f side1, side2, side3; side1 = v[1 ] - v[0 ]; side2 = v[2 ] - v[1 ]; side3 = v[0 ] - v[2 ]; Vector3f p1, p2, p3; p1 = p - v[0 ]; p2 = p - v[1 ]; p3 = p - v[2 ]; Vector3f cross1, cross2, cross3; cross1 = p1.cross (side1); cross2 = p2.cross (side2); cross3 = p3.cross (side3); if ((cross1.z () > 0 && cross2.z () > 0 && cross3.z () > 0 ) || (cross1.z () < 0 && cross2.z () < 0 && cross3.z () < 0 )) { return true ; } else return false ; }
重心坐标 对于一个在三角形中的点,我们需要获得这个点的坐标颜色等信息,而这些信息来源于三角形三个顶点对应信息的加权平均,一个确定权值的方法是重心坐标
1 2 3 4 5 6 7 8 9 10 11 12 13 14 15 16 std::tuple<float , float , float > Renderer::Barycentric (float x, float y, const Vector4f* v) Vector4f A = v[0 ]; Vector4f B = v[1 ]; Vector4f C = v[2 ]; float i = (-(x - B.x ()) * (C.y () - B.y ()) + (y - B.y ()) * (C.x () - B.x ())) / (-(A.x () - B.x ()) * (C.y () - B.y ()) + (A.y () - B.y ()) * (C.x () - B.x ())); float j = (-(x - C.x ()) * (A.y () - C.y ()) + (y - C.y ()) * (A.x () - C.x ())) / (-(B.x () - C.x ()) * (A.y () - C.y ()) + (B.y () - C.y ()) * (A.x () - C.x ())); float k = 1 - i - j; return { i,j,k }; }
片元着色 1 2 3 4 5 6 7 8 9 10 11 12 13 14 15 16 17 18 19 20 21 22 23 24 25 26 27 28 29 30 31 32 33 34 35 36 37 38 39 40 41 42 43 44 45 46 47 48 49 50 51 52 53 54 55 56 57 58 59 60 61 62 63 64 65 66 67 68 69 70 void Renderer::FragmentShader (std::vector<Object>& objects) for (Object& object : objects) { for (Triangle& t : object.Mesh) { float minXf, maxXf, minYf, maxYf; minXf = _width; maxXf = 0 ; minYf = _height; maxYf = 0 ; for (const auto & ver : t.vertex) { if (ver.x () < minXf) minXf = ver.x (); if (ver.x () > maxXf) maxXf = ver.x (); if (ver.y () < minYf) minYf = ver.y (); if (ver.y () > maxYf) maxYf = ver.y (); } if (minXf < 0 ) minXf = 0 ; if (maxXf > _width) maxXf = _width; if (minYf < 0 ) minYf = 0 ; if (maxYf > _height) maxYf = _height; int minX, maxX, minY, maxY; minX = floor (minXf); maxX = ceil (maxXf); minY = floor (minYf); maxY = ceil (maxYf); for (int y = minY; y < maxY; ++y) { for (int x = minX; x < maxX; ++x) { if (InsideTriangle ((float )x + 0.5f , (float )y + 0.5f , t)) { float alpha2D, beta2D, gamma2D; std::tie (alpha2D, beta2D, gamma2D) = Barycentric ((float )x + 0.5f , (float )y + 0.5f , t.vertex); float theZ = Interpolate (alpha2D, beta2D, gamma2D, t.vertex[0 ].z (), t.vertex[1 ].z (), t.vertex[2 ].z ()); if (_zBuffer[GetPixelIndex (x, y)] > theZ) { Vector3f interpolateColor = Interpolate (alpha2D, beta2D, gamma2D, t.color[0 ], t.color[1 ], t.color[2 ]); Vector4f interpolateNormal = Interpolate (alpha2D, beta2D, gamma2D, t.normal[0 ], t.normal[1 ], t.normal[2 ]); Vector2f interpolateUV = Interpolate (alpha2D, beta2D, gamma2D, t.uv[0 ], t.uv[1 ], t.uv[2 ]); Vector4f interpolateViewportPos = Interpolate (alpha2D, beta2D, gamma2D, t.vertex[0 ], t.vertex[1 ], t.vertex[2 ]); Vector4f interpolateWorldPos = Interpolate (alpha2D, beta2D, gamma2D, t.worldVertex[0 ], t.worldVertex[1 ], t.worldVertex[2 ]); Vector3f pixelColor = object.Shader->GetColor ({ &object,interpolateViewportPos,interpolateWorldPos,interpolateColor,(GetModelMatrix (object)*interpolateNormal).normalized (),interpolateUV }); SetPixelColor (x, y, pixelColor); _zBuffer[GetPixelIndex (x, y)] = theZ; } } } } } } }
我们要进行逐片元的操作,以上代码的8~31行,是为了创建三角形的包围盒,先检测点是否在三角形的包围盒中,如果在,再检测点是否在三角形中,这样做可以减少一定的计算量
48行判断点的深度,如果点的z轴数值小于zbuffer中存储的数值,说明这个片元在缓存中片元的前方,那么对于不透明物体,就可以用这个片元的信息将上一个片元的信息覆盖掉
50~58行通过重心坐标计算片元的信息,准备将这些信息发送给着色器
61行通过着色器获取这个片元的颜色,我们现在给出一个简单的Shader的例子
1 2 3 4 5 6 7 class NullShader : public Shader{ Vector3f GetColor (const FragmentData& data) override { return data.color; } };
62和63行,我们向帧缓存和zBuffer中存入片元的信息,其中帧缓存存储片元的颜色,用于之后在窗口中绘制画面,zBuffer存储片元的深度
下面给出其他用到的函数的定义
1 2 3 4 5 6 7 8 9 10 11 12 13 14 15 16 17 18 19 20 21 22 23 24 25 26 27 28 29 30 void Renderer::SetPixelColor (int x,int y, const Vector3f color) int ind = GetPixelIndex (x,y); _frameBuffer[ind] = color; } int Renderer::GetPixelIndex (int x, int y) return x+(_height-y-1 )*_width; } Vector2f Renderer::Interpolate (float alpha, float beta, float gamma, const Vector2f& vert1, const Vector2f& vert2, const Vector2f& vert3) return (alpha * vert1 + beta * vert2 + gamma * vert3); } Vector3f Renderer::Interpolate (float alpha, float beta, float gamma, const Vector3f& vert1, const Vector3f& vert2, const Vector3f& vert3) return (alpha * vert1 + beta * vert2 + gamma * vert3); } Vector4f Renderer::Interpolate (float alpha, float beta, float gamma, const Vector4f& vert1, const Vector4f& vert2, const Vector4f& vert3) return (alpha * vert1 + beta * vert2 + gamma * vert3); } float Renderer::Interpolate (float alpha, float beta, float gamma, const float & vert1, const float & vert2, const float & vert3) return (alpha * vert1 + beta * vert2 + gamma * vert3); }
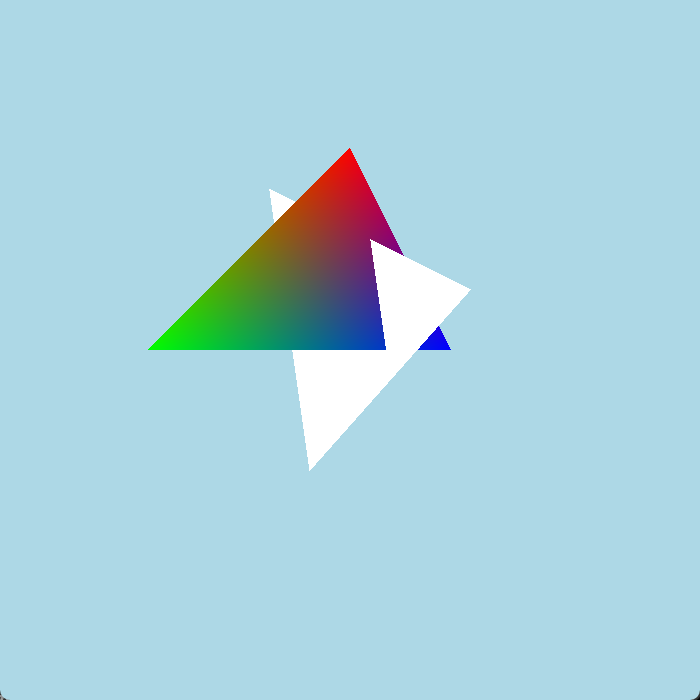
主程序 如此我们就可以渲染三角形了
1 2 3 4 5 6 7 8 9 10 11 12 13 14 15 16 17 18 19 20 21 22 23 24 25 26 27 28 29 30 31 32 33 34 35 36 37 38 39 40 41 42 43 44 45 46 47 48 49 50 51 52 53 54 55 56 57 58 59 60 61 62 63 64 65 66 67 68 69 70 71 72 73 74 75 76 77 78 79 80 81 82 83 84 85 86 87 88 89 90 91 92 93 94 95 96 97 98 99 100 101 102 103 104 105 106 107 108 109 110 111 112 113 114 115 116 117 118 119 120 121 122 123 124 125 126 127 128 129 130 131 132 133 134 135 136 137 138 #include <iostream> #include "Renderer.h" #include "OBJ_Loader.h" #include "Shader.h" #include "thread" #include <glfw3.h> constexpr int width = 700 ;constexpr int height = 700 ;std::vector<Object> objectList; Light light; Camera camera; int frameCount = 0 ;void SetCamera () camera.Position = Vector4f (0 ,0 , 10 ,1 ); camera.Direction = Vector3f (0 , 0 , -1 ).normalized (); camera.Up = Vector3f (0 , 1 , 0 ).normalized (); camera.Fov = 60.f ; camera.Near = 0.1f ; camera.Far = 60.f ; camera.AspectRatio = width / height; } void SetLight () light.Position = Vector4f (10 , 20 , 10 , 1 ); light.Direction = Vector3f (-1 , -2 , -1 ).normalized (); light.Intensity = 0.8 ; light.Color = Vector3f (1 ,1 ,1 ); light.ShadowMap.resize (height * width); } void SetObjects () Object o1; Triangle t1; t1.SetVertex (Vector3f (0 , 2 , -2 ), Vector3f (-2 , 0 , -2 ), Vector3f (1 , 0 , -2 )); t1.SetColor (Vector3f (1 , 0 , 0 ), Vector3f (0 , 1 , 0 ), Vector3f (0 , 0 , 1 )); t1.SetUV (Vector2f (0 , 0 ), Vector2f (0 , 0 ), Vector2f (0 , 0 )); t1.SetNormal (Vector4f (0 , 0 , 0 , 0 ), Vector4f (0 , 0 , 0 , 0 ), Vector4f (0 , 0 , 0 , 0 )); o1.Mesh.push_back (t1); o1.Shader = new NullShader (); o1.Position = Vector3f (0 , 0 , 0 ); o1.Rotation = Vector3f (0 , 0 , 0 ); o1.Scale = Vector3f (2 , 2 , 1 ); objectList.push_back (o1); Object o2; Triangle t2; t2.SetVertex (Vector3f (2 , 1 , 0 ), Vector3f (-2 , 4 , -5 ), Vector3f (-1 , -3 , -5 )); t2.SetColor (Vector3f (1 , 1 , 1 ), Vector3f (1 , 1 , 1 ), Vector3f (1 , 1 , 1 )); t2.SetUV (Vector2f (0 , 0 ), Vector2f (0 , 0 ), Vector2f (0 , 0 )); t2.SetNormal (Vector4f (0 , 0 , 0 , 0 ), Vector4f (0 , 0 , 0 , 0 ), Vector4f (0 , 0 , 0 , 0 )); o2.Mesh.push_back (t2); o2.Shader = new NullShader (); o2.Position = Vector3f (0 , 0 , 0 ); o2.Rotation = Vector3f (0 , 0 , 0 ); o2.Scale = Vector3f (1 , 1 , 1 ); objectList.push_back (o2); } int main () if (!glfwInit ()) { return -1 ; } GLFWwindow* window = glfwCreateWindow (width, height, "PurpleFlowerRenderer" , NULL , NULL ); if (!window) { glfwTerminate (); return -1 ; } glfwMakeContextCurrent (window); Renderer r (width, height) ; SetObjects (); SetLight (); SetCamera (); glfwSetInputMode (window, GLFW_CURSOR, GLFW_CURSOR_DISABLED); do { r.Clear (); std::vector<Object> list = objectList; r.VertexShader (list, camera); r.FragmentShader (list); glClear (GL_COLOR_BUFFER_BIT); glMatrixMode (GL_PROJECTION); glLoadIdentity (); glOrtho (0.0 , width, 0.0 , height, -1.0 , 1.0 ); glMatrixMode (GL_MODELVIEW); glLoadIdentity (); glBegin (GL_POINTS); glPointSize (1.0f ); for (int y = 0 ; y < height; y++) for (int x = 0 ; x < width; x++) { auto color = r.GetFrameBuffer ()[r.GetPixelIndex (x, y)]; glColor3f (color.x (), color.y (), color.z ()); glVertex2f (x, y); } glEnd (); glfwSwapBuffers (window); glfwPollEvents (); std::cout << "第" << ++frameCount << "帧" << "\n" ; } while (!glfwWindowShouldClose (window)); glfwDestroyWindow (window); glfwTerminate (); }
关于Shader 成功的渲染三角形证明我们的渲染器可以正常工作,但是,上面的物体过于简单,只是两个单三角形组成的物体,还没有shader
为了渲染出酷炫的效果,我们需要定义不同的Shader,而没有了模型,我们的Shader也缺少了酷炫效果的依托
解析obj文件 我们要将.obj文件中的数据解析为我们自己的数据结构
这里我们使用开源的obj文件解析工具OBJ-Loader
1 2 3 4 5 6 7 8 9 10 11 12 13 14 15 16 17 18 19 20 21 22 23 24 25 26 27 28 29 30 31 32 33 void SetModel (std::string objName, Vector3f pos, Vector3f rotation, Vector3f scale,Shader* shader) objl::Loader loader; std::string objPath = "Res/Models/" ; bool bLoad = loader.LoadFile (objPath + objName + ".obj" ); if (bLoad) { for (const auto & mesh : loader.LoadedMeshes) { Object* o = new Object (); for (int i = 0 ; i < mesh.Indices.size ()-2 ; i += 3 ) { Triangle* t = new Triangle (); for (int j = 0 ; j < 3 ; j++) { t->SetVertex (j, Vector3f (mesh.Vertices[mesh.Indices[i+j]].Position.X, mesh.Vertices[mesh.Indices[i + j]].Position.Y, mesh.Vertices[mesh.Indices[i + j]].Position.Z)); t->SetColor (j, Vector3f (0.3f , 0.3f , 0.3f )); t->SetNormal (j, Vector4f (mesh.Vertices[mesh.Indices[i + j]].Normal.X, mesh.Vertices[mesh.Indices[i + j]].Normal.Y, mesh.Vertices[mesh.Indices[i + j]].Normal.Z,1 )); t->SetUV (j, Vector2f (mesh.Vertices[mesh.Indices[i + j]].TextureCoordinate.X, mesh.Vertices[mesh.Indices[i + j]].TextureCoordinate.Y)); } o->Mesh.push_back (*t); } o->Position = pos; o->Rotation = rotation; o->Scale = scale; o->Shader = shader; objectList.push_back (*o); } } else std::cout << "模型加载失败" << std::endl; }
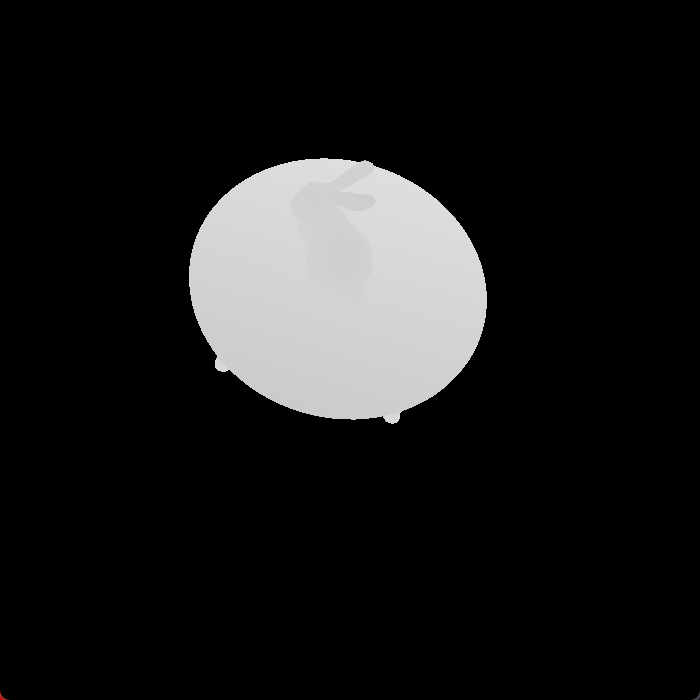
然后我们写个Shader,将模型的法线直接作为颜色返回
1 2 3 4 5 6 7 8 9 10 11 class NormalShader : public Shader{ public : Vector3f GetColor (const FragmentData& data) override { Vector3f worldNormal = Vector3f (data.normal.x (), data.normal.y (), data.normal.z ()); Vector3f returnColor = (worldNormal + Vector3f (1.0f , 1.0f , 1.0f )) / 2.0f ; return returnColor; } };
将上文代码中主函数的86行SetObjects()删掉,换成SetModel("bunny", Vector3f(0, -3, 0), Vector3f(0, 0, 0), Vector3f(30, 30, 30),new NormalShader());
运行代码
Blinn-Phong Blinn-Phong光照模型是一个经典的经验模型,我们需要片元的法线方向,光的方向,摄像机的方向等参数输入着色器
1 2 3 4 5 6 7 8 9 10 11 12 13 14 15 16 17 18 19 20 21 22 23 24 25 26 27 28 29 30 31 32 33 34 35 inline Vector3f BlendColor (Vector3f a,Vector3f b) return Vector3f (a.x () * 0.5f + b.x () * 0.5f , a.y () * 0.5f + b.y () * 0.5f , a.z () * 0.5f + b.z () * 0.5f ); } class BlinnPhongShader : public Shader{ private : Light* _light; Camera* _camera; public : BlinnPhongShader (Light* light,Camera* camera): _light(light),_camera(camera) {} Vector3f GetColor (const FragmentData& data) override { Vector3f worldNormal = Vector3f (data.normal.x (),data.normal.y (),data.normal.z ()); Vector3f resultColor = Vector3f (0 , 0 , 0 ); float halfLambert = (worldNormal.dot (_light->Direction)+1 )/2 ; Vector3f diffuse = BlendColor (_light->Color*_light->Intensity,data.color) * halfLambert; Vector3f ambient = Vector3f (0.05f , 0.05f , 0.05f ); Vector3f halfDirection = (_camera->Direction + _light->Direction).normalized (); Vector3f specular = BlendColor (_light->Color,Vector3f (1 ,1 ,1 )) * pow (Clamp (halfDirection.dot (worldNormal)),50 )*_light->Intensity; resultColor += ambient+ diffuse + specular; return resultColor; } };
将SetModel改为SetModel("bunny", Vector3f(0, -3, 1), Vector3f(0, 0, 0), Vector3f(30, 30, 30), new BlinnPhongShader(&light, &camera));
注意其中我对光和法线的点积得数的处理使用的是半兰伯特模型的方法,也就是将这个得数+1除以二,而不是截取0到1的值,相比于兰伯特模型,会使模型在不被光照到的地方变得更亮
我们还可以在此基础上做一点改进,实现一个简单的卡通渲染
1 2 3 4 5 6 7 8 9 10 11 12 13 14 15 16 17 18 19 20 21 22 23 24 25 26 27 28 29 30 31 32 33 34 35 36 37 38 39 40 class CartoonShader : public Shader{ private : Light* _light; Camera* _camera; Vector3f _baseColor; public : CartoonShader (Light* light, Camera* camera,Vector3f baseColor) : _light(light), _camera(camera),_baseColor(baseColor) { } Vector3f GetColor (const FragmentData& data) override { Vector3f worldNormal = Vector3f (data.normal.x (), data.normal.y (), data.normal.z ()); Vector3f resultColor = Vector3f (0 , 0 , 0 ); float halfLambert = (worldNormal.dot (_light->Direction) + 1 ) / 2 ; Vector3f diffuse = BlendColor (_light->Color * _light->Intensity, data.color) * halfLambert; Vector3f ambient = Vector3f (0.05f , 0.05f , 0.05f ); Vector3f halfDirection = (_camera->Direction + _light->Direction).normalized (); Vector3f specular = BlendColor (_light->Color, Vector3f (1 , 1 , 1 )) * pow (Clamp (halfDirection.dot (worldNormal)), 50 ) * _light->Intensity; resultColor += ambient + diffuse + specular; float num = resultColor.norm (); Vector3f returnColor = Vector3f (); if (num > 0.8f ) returnColor = _baseColor; else if (num > 0.6f ) returnColor = _baseColor*0.8f ; else if (num > 0.4f ) returnColor = _baseColor*0.6f ; else if (num > 0.2f ) returnColor = _baseColor*0.4f ; return returnColor; } };
将SetModel改为SetModel("bunny", Vector3f(0, -3, 0), Vector3f(0, 0, 0), Vector3f(30, 30, 30), new CartoonShader(&light, &camera, Vector3f(1, 0, 0)));
纹理映射 模型的表面是如何显示出相对真实的复杂的颜色的呢,我们可以想象,是一张图片像布一样盖在了模型上,并且这块布有一定的可拉伸性,对一模型上的每一个顶点,都用钉子将布上的某一个点钉在模型的顶点上,而表面上非顶点的点就可以通过布的拉伸获取到盖在这个点上的颜色,这就是纹理映射
我们要做的,就是钉钉子,也就是通过顶点的uv坐标获取图片上的颜色,输入给每个顶点,片元的颜色就可以通过重心坐标得到
定义纹理 我们首先定义纹理的数据结构,同时给出解析bmp文件的函数
1 2 3 4 5 6 7 8 9 10 11 12 13 14 15 16 17 18 19 20 21 22 23 24 25 26 27 28 29 30 31 32 33 34 35 36 37 38 39 40 41 42 43 44 45 46 47 48 49 50 51 52 53 54 55 56 57 58 59 60 61 62 63 64 65 66 67 68 69 70 71 72 73 74 75 76 77 78 79 80 81 82 83 84 85 86 87 88 89 90 91 92 93 94 #pragma once #include <windows.h> #include <Eigen> #include <fstream> #include <vector> #include <cstdint> #include <stdexcept> using namespace Eigen;struct Color { uint8_t r, g, b, a; }; inline std::vector<std::vector<Color>> loadBMP (const std::string & filepath){ std::ifstream file (filepath, std::ios::binary) ; if (!file.is_open ()) { throw std::runtime_error ("Unable to open file" ); } BITMAPFILEHEADER fileHeader; file.read (reinterpret_cast <char *>(&fileHeader), sizeof (fileHeader)); if (fileHeader.bfType != 0x4D42 ) { throw std::runtime_error ("Not a BMP file" ); } BITMAPINFOHEADER infoHeader; file.read (reinterpret_cast <char *>(&infoHeader), sizeof (infoHeader)); if (infoHeader.biBitCount != 24 && infoHeader.biBitCount != 32 ) { throw std::runtime_error ("Unsupported BMP format" ); } file.seekg (fileHeader.bfOffBits, std::ios::beg); int width = infoHeader.biWidth; int height = infoHeader.biHeight; bool flip = height > 0 ; height = std::abs (height); std::vector<std::vector<Color>> textureData (height, std::vector <Color>(width)); int row_padded = (width * (infoHeader.biBitCount / 8 ) + 3 ) & (~3 ); std::vector<uint8_t > row_data (row_padded) ; for (int y = 0 ; y < height; ++y) { int row = flip ? height - 1 - y : y; file.read (reinterpret_cast <char *>(row_data.data ()), row_padded); for (int x = 0 ; x < width; ++x) { if (infoHeader.biBitCount == 24 ) { textureData[row][x] = { row_data[x * 3 + 2 ], row_data[x * 3 + 1 ], row_data[x * 3 ], 255 }; } else if (infoHeader.biBitCount == 32 ) { textureData[row][x] = { row_data[x * 4 + 2 ], row_data[x * 4 + 1 ], row_data[x * 4 ], row_data[x * 4 + 3 ] }; } } } return textureData; } class Texture { private : std::vector<std::vector<Color>> _image; public : Texture (const std::string& bmpName) { const std::string path = "Res/Texture/" + bmpName+".bmp" ; _image = loadBMP (path); } Color GetColor (float u, float v) { u = u - floor (u); v = v - floor (v); float uT = u * (_image[0 ].size () - 1 ); float vT = (1 -v) * (_image.size () - 1 ); return _image[vT][uT]; } };
纹理映射 然后我们给出纹理映射Shader的定义,我这里是同时将Blinn-Phong也写在了里面
1 2 3 4 5 6 7 8 9 10 11 12 13 14 15 16 17 18 19 20 21 22 23 24 25 26 27 28 29 30 31 32 33 34 class TextureShader : public Shader{ private : Texture* _texture; Light* _light; Camera* _camera; public : TextureShader (Light* light, Camera* camera,Texture* texture) : _light(light), _camera(camera),_texture(texture){} Vector3f GetColor (const FragmentData& data) override { auto color = _texture->GetColor (data.uv.x (), data.uv.y ()); Vector3f modelColor = Vector3f (static_cast <float >(color.r)/255.0f , static_cast <float >(color.g) / 255.0f , static_cast <float >(color.b) / 255.0f ); Vector3f worldNormal = Vector3f (data.normal.x (), data.normal.y (), data.normal.z ()); Vector3f resultColor = Vector3f (0 , 0 , 0 ); float halfLambert = (worldNormal.dot (_light->Direction) + 1 ) / 2 ; Vector3f diffuse = BlendColor (_light->Color * _light->Intensity, modelColor) * halfLambert; Vector3f ambient = Vector3f (0.05f , 0.05f , 0.05f ); Vector3f halfDirection = (_camera->Direction + _light->Direction).normalized (); Vector3f specular = BlendColor (_light->Color, Vector3f (1 , 1 , 1 )) * pow (Clamp (halfDirection.dot (worldNormal)), 50 ) * _light->Intensity; resultColor += ambient + diffuse + specular; return resultColor; } };
将SetModel改为SetModel("12140_Skull_v3_L2", Vector3f(0, 0, 0), Vector3f(-90, 0, 0), Vector3f(0.15, 0.15, 0.15), new TextureShader(&light, &camera, new Texture("Skull")));
Shadow Map 原理 如何显示阴影呢?要想使片元产生阴影的效果并不难,只需要在Shader返回的颜色中不加上光的颜色,或者仅仅把颜色整体成比例减少就可以,比如把颜色乘0.5
问题在于我们如何判断一个片元是否在阴影里,我们可以转化一下这个问题,让它变成如何判断光是否能看到这个片元
一个片元如果在一个光源产生的阴影里,就应该在光看不到的地方,理解这个很简单,也很重要
我们回忆摄像机如何判断是否能看到这个物体,是通过zBuffer,对于一个片元,如果片元的深度小于深度缓存的中值,则说明相机能看到这个物体,更新深度缓存为新片元的深度
我们可以给光一个zBuffer来存储光看到的片元的深度,按照这个思路,投射阴影和接收阴影就变成了两个步骤
如果一个物体能够投射阴影,它就应该可以作为参数更新光的zBuffer,如果一个物体能够接收阴影,它就应该可以从光的zBuffer中取值判断自己的片元是否能被光看到,二者不冲突
这个zBuffer,就可以叫做Shadow Map
投射阴影 首先我们实现投射阴影的函数
1 2 3 4 5 6 7 8 9 10 11 12 13 14 15 16 17 18 19 20 21 22 23 24 25 26 27 28 29 30 31 32 33 34 35 36 37 38 39 40 41 42 43 44 45 46 47 48 49 50 51 52 53 54 55 56 57 58 59 60 61 62 63 64 65 66 67 68 69 70 71 72 73 74 75 76 77 78 79 80 81 82 83 84 85 86 87 88 89 90 91 92 93 94 95 96 97 98 99 100 101 102 103 104 105 106 107 108 109 110 111 112 113 114 #pragma once #include <Eigen> #include <iostream> #include "Object.h" #include <vector> #include "Renderer.h" #include <opencv2/opencv.hpp> using namespace Eigen;struct Light { Vector3f Direction; Vector3f Color; float Intensity; Vector4f Position; int ShadowMapWidth; int ShadowMapHeight; Camera VirtualCamera; std::vector<float > ShadowMap; void SetShadowMap (std::vector<Object>& theObjList,int width,int height) { ShadowMap.reserve (width * height); std::fill (ShadowMap.begin (), ShadowMap.end (), std::numeric_limits<float >::infinity ()); ShadowMapWidth = width; ShadowMapHeight = height; std::vector<Object> objList = theObjList; Renderer r = Renderer (width, height); VirtualCamera.Position = Position; VirtualCamera.Direction = Direction; Matrix3f rotation; rotation<< 0 , 1 , 0 , 0 , 0 , -1 , 1 , 0 , 0 ; VirtualCamera.Up = rotation *Direction; VirtualCamera.Fov = 60.f ; VirtualCamera.Near = 0.1f ; VirtualCamera.Far = 60.f ; VirtualCamera.AspectRatio = width/height; r.VertexShader (objList, VirtualCamera); for (Object& object : objList) { for (Triangle& t : object.Mesh) { float minXf, maxXf, minYf, maxYf; minXf = width; maxXf = 0 ; minYf = height; maxYf = 0 ; for (const auto & ver : t.vertex) { if (ver.x () < minXf) minXf = ver.x (); if (ver.x () > maxXf) maxXf = ver.x (); if (ver.y () < minYf) minYf = ver.y (); if (ver.y () > maxYf) maxYf = ver.y (); } if (minXf < 0 ) minXf = 0 ; if (maxXf > width) maxXf = width; if (minYf < 0 ) minYf = 0 ; if (maxYf > height) maxYf = height; int minX, maxX, minY, maxY; minX = floor (minXf); maxX = ceil (maxXf); minY = floor (minYf); maxY = ceil (maxYf); for (int y = minY; y < maxY; ++y) { for (int x = minX; x < maxX; ++x) { if (Renderer::InsideTriangle ((float )x + 0.5f , (float )y + 0.5f , t)) { float alpha2D, beta2D, gamma2D; std::tie (alpha2D, beta2D, gamma2D) = Renderer::Barycentric ((float )x + 0.5f , (float )y + 0.5f , t.vertex); float theZ = Renderer::Interpolate (alpha2D, beta2D, gamma2D, t.vertex[0 ].z (), t.vertex[1 ].z (), t.vertex[2 ].z ()); if (ShadowMap[x + (ShadowMapHeight - y - 1 ) * ShadowMapWidth] > theZ) { ShadowMap[x + (ShadowMapHeight - y - 1 ) * ShadowMapWidth] = theZ; float num = pow (theZ,40 ); r.GetFrameBuffer ()[x + (ShadowMapHeight - y - 1 ) * ShadowMapWidth] = Vector3f (num, num, num) * 255.0f ; } } } } } } cv::Mat image (height, width, CV_32FC3, r.GetFrameBuffer().data()) ; image.convertTo (image, CV_8UC3, 1.0f ); cv::cvtColor (image, image, cv::COLOR_RGB2BGR); cv::imshow ("light_z" , image); int key = cv::waitKey (1 ); } };
你可以注意到我为了省事,直接新建了一个渲染器,又拿一个位置和方向跟光相同的相机来获取zBuffer,也就是光的ShadowMap,其中大部分逻辑和渲染器中的差不多
108~112行是为了显示光的深度图,主函数里显示图像用的是glfw,这里用的是opencv,这是我写代码过程中的一个历史遗留问题,反正你懂我的意思就行
接收阴影 接收阴影的判断写在Shader中
1 2 3 4 5 6 7 8 9 10 11 12 13 14 15 16 17 18 19 20 21 22 23 24 25 26 27 28 29 30 31 32 33 34 35 36 37 38 39 40 41 42 43 44 45 46 47 48 49 50 51 52 53 54 55 56 57 58 59 class ShadowShader : public Shader{ private : Light* _light; Camera* _camera; public : ShadowShader (Light* light, Camera* camera) : _light(light), _camera(camera) { } Vector3f GetColor (const FragmentData& data) override { Vector3f worldNormal = Vector3f (data.normal.x (), data.normal.y (), data.normal.z ()); Vector3f resultColor = Vector3f (0 , 0 , 0 ); float halfLambert = (worldNormal.dot (_light->Direction) + 1 ) / 2 ; Vector3f diffuse = BlendColor (_light->Color * _light->Intensity, data.color, 0.5f ) * halfLambert; Vector3f ambient = Vector3f (0.05f , 0.05f , 0.05f ); Vector3f halfDirection = (_camera->Direction + _light->Direction).normalized (); Vector3f specular = BlendColor (_light->Color, Vector3f (1 , 1 , 1 )) * pow (Clamp (halfDirection.dot (worldNormal)), 50 ) * _light->Intensity; Camera virtualCamera = _light->VirtualCamera; Vector4f worldPos = data.worldPos; Matrix4f lightViewport; lightViewport << _light->ShadowMapWidth / 2 , 0 , 0 , _light->ShadowMapWidth / 2 , 0 , _light->ShadowMapHeight / 2 , 0 , _light->ShadowMapHeight / 2 , 0 , 0 , 1 , 0 , 0 , 0 , 0 , 1 ; Vector4f lightViewportPos = lightViewport * Renderer::GetClipMatrix (virtualCamera) * Renderer::GetViewMatrix (virtualCamera)*worldPos; lightViewportPos.x () /= lightViewportPos.w (); lightViewportPos.y () /= lightViewportPos.w (); lightViewportPos.z () /= lightViewportPos.w (); lightViewportPos.w () /= lightViewportPos.w (); int x = floor (lightViewportPos.x ()); int y = floor (lightViewportPos.y ()); if (x >= 0 && x < _light->ShadowMapWidth && y >= 0 && y < _light->ShadowMapHeight && _light->ShadowMap[x + (_light->ShadowMapHeight - y - 1 ) * _light->ShadowMapWidth]!= std::numeric_limits<float >::infinity ()) if (lightViewportPos.z ()> (_light->ShadowMap[x + (_light->ShadowMapHeight - y - 1 ) * _light->ShadowMapWidth])+0.00025f ) { specular = Vector3f (0 , 0 , 0 ); diffuse = Vector3f (0 , 0 , 0 ); } resultColor += ambient + diffuse + specular; return resultColor; } };
其中,29~40行是为了计算片元在屏幕空间下的深度和xy坐标,这是因为ShadowMap中存储的深度是屏幕空间下的深度,而我们在Shader中获取的片元的坐标是世界空间的坐标
48行判断深度,请注意判断的后面要加上一个偏移,我这里是0.00025,如果不加,在阴影部分与明亮部分的边界会出现条状的走样
51,52行实现阴影的方式比较粗暴,不过为了测试阴影的黑色重一点也无妨
测试 将主函数中的SetModel改为
SetModel("Table", Vector3f(0, -6, 0), Vector3f(0, 0, 0), Vector3f(5, 3, 5), new ShadowShader(&light, &camera));
SetModel("bunny", Vector3f(0, -3, 0), Vector3f(0, 0, 0), Vector3f(30, 30, 30), new CartoonShader(&light, &camera, Vector3f(1, 0, 0)));
在主函数中添加light.SetShadowMap(objectList, width, height);
其他功能 背景 这个渲染器是要交作业的,我来不及加天空盒了,但是我想到了一个伪造背景的点子,那就是每次清楚渲染器帧缓存的时候不用硬编码的数据覆盖,而是用一张纹理的颜色
1 2 3 4 5 6 7 8 9 10 11 12 13 void Renderer::Clear (Texture* background) for (int x = 0 ; x < _width; x++) for (int y = 0 ; y < _height; y++) { auto color = background->GetColor ((float )x/_width, (float )y/_height); _frameBuffer[GetPixelIndex (x, y)] = Vector3f (color.r,color.g,color.b)/255.0f ; } std::fill (_zBuffer.begin (), _zBuffer.end (), std::numeric_limits<float >::infinity ()); }
输入参数 我们可以输入一些参数给Shader,让其通过不同的参数给出不同的效果,比如说我现在规定可以输入两个float
1 2 3 4 5 6 7 8 9 10 11 12 13 14 15 16 17 18 19 20 21 22 23 24 25 26 27 28 void InputObject (GLFWwindow* window) Vector3f rotation = { 0 ,0 ,0 }; if (glfwGetKey (window, GLFW_KEY_1) == GLFW_PRESS) { inputFloat1 += 0.01f ; } if (glfwGetKey (window, GLFW_KEY_2) == GLFW_PRESS) { inputFloat1 -= 0.01f ; } if (glfwGetKey (window, GLFW_KEY_3) == GLFW_PRESS) { inputFloat2 += 0.1f ; } if (glfwGetKey (window, GLFW_KEY_4) == GLFW_PRESS) { inputFloat2 -= 0.1f ; } if (glfwGetKey (window, GLFW_KEY_LEFT) == GLFW_PRESS) { rotation += Vector3f (0 , 3 , 0 ); } if (glfwGetKey (window, GLFW_KEY_RIGHT) == GLFW_PRESS) { rotation -= Vector3f (0 , 3 , 0 ); } for (auto & obj : objectList) { obj.Rotation += rotation; } }
以上代码也包括旋转物体的功能
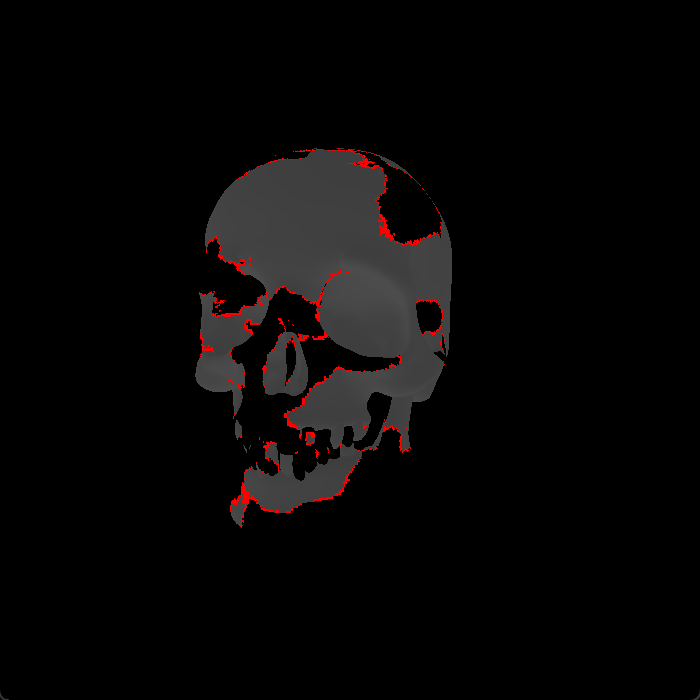
然后我们可以实现一个溶解效果的Shader
1 2 3 4 5 6 7 8 9 10 11 12 13 14 15 16 17 18 19 20 21 22 23 24 25 26 27 28 29 30 31 32 33 34 35 36 37 38 39 40 41 42 43 class DissolveShader : public Shader{ private : Light* _light; Camera* _camera; Vector3f _lineColor; Texture* _noise; float * _cutValue; float * _lineWidth; public : DissolveShader (Light* light, Camera* camera,Vector3f lineColor,Texture* noise,float * cutValue,float * lineWidth) : _light(light), _camera(camera),_lineColor(lineColor),_noise(noise), _cutValue(cutValue),_lineWidth(lineWidth) {} Vector3f GetColor (const FragmentData& data) override { Vector3f worldNormal = Vector3f (data.normal.x (), data.normal.y (), data.normal.z ()); Vector3f resultColor = Vector3f (0 , 0 , 0 ); float halfLambert = (worldNormal.dot (_light->Direction) + 1 ) / 2 ; Vector3f diffuse = BlendColor (_light->Color * _light->Intensity, data.color, 0.3f ) * halfLambert; Vector3f ambient = Vector3f (0.05f , 0.05f , 0.05f ); Vector3f halfDirection = (_camera->Direction + _light->Direction).normalized (); Vector3f specular = BlendColor (_light->Color, Vector3f (1 , 1 , 1 )) * pow (Clamp (halfDirection.dot (worldNormal)), 50 ) * _light->Intensity; resultColor += ambient + diffuse + specular; if (_noise->GetColor (data.uv.x (), data.uv.y ()).r - *_cutValue *255 < 0 ) { return Vector3f (0 ,0 ,0 ); } if (_noise->GetColor (data.uv.x (), data.uv.y ()).r - *_cutValue *255 - *_lineWidth< 0 ) return _lineColor; return resultColor; } };
以上逻辑中,我们通过一张噪声来提供判断片元是否被溶解的阈值,如果噪声纹理的r值小于我们输入的阈值,就认为已经被溶解,如果r值”差一点“就小于输入的阈值,就认为正在被溶解,返回描边的颜色
将主函数中的SetModel改为SetModel("12140_Skull_v3_L2", Vector3f(0, 0, 0), Vector3f(-90, 0, 0), Vector3f(0.15, 0.15, 0.15), new DissolveShader(&light, &camera, Vector3f(1, 0, 0), new Texture("noise"), &inputFloat1,&inputFloat2));
控制相机和物体旋转 既然我们已经能输入了,那不妨输入的复杂一点,来控制摄像机的移动
1 2 3 4 5 6 7 8 9 10 11 12 13 14 15 16 17 18 19 20 21 22 23 24 25 26 27 28 29 30 31 32 33 34 35 36 37 38 39 40 41 42 43 44 45 46 47 48 49 50 51 52 53 54 55 56 57 58 59 60 61 62 63 64 65 66 67 68 69 70 71 72 73 74 75 76 77 78 79 80 81 82 83 84 85 86 87 88 89 90 91 92 93 94 95 96 97 98 99 100 101 102 103 104 105 106 107 108 109 110 void MouseCameraInput (GLFWwindow* window, double xpos, double ypos) if (firstMouse) { lastX = xpos; lastY = ypos; firstMouse = false ; } float xoffset = xpos - lastX; float yoffset = lastY - ypos; lastX = xpos; lastY = ypos; float sensitivity = 0.1f ; xoffset *= sensitivity; yoffset *= sensitivity; yaw += xoffset; pitch += yoffset; if (pitch > 89.0f ) pitch = 89.0f ; if (pitch < -89.0f ) pitch = -89.0f ; Vector3f front = Vector3f (cos (yaw*PI/180.0f ) * cos (pitch * PI / 180.0f ), sin (pitch * PI / 180.0f ), sin (yaw * PI / 180.0f )) * cos (pitch * PI / 180.0f ); camera.Direction = front.normalized (); Vector3f worldUp (0.0f , 1.0f , 0.0f ) ; Vector3f right = camera.Direction.cross (worldUp).normalized (); camera.Up = right.cross (camera.Direction).normalized (); } void InputCamera (GLFWwindow* window) float moveSpeed = 1.0f ; float rotateSpeed = 0.05f ; Vector3f right = camera.Direction.cross (camera.Up); if (glfwGetKey (window, 'W' ) == GLFW_PRESS) { camera.Position += Cast (camera.Direction * moveSpeed, 0.0f ); } if (glfwGetKey (window, 'S' ) == GLFW_PRESS) { camera.Position -= Cast (camera.Direction * moveSpeed, 0.0f ); } if (glfwGetKey (window, 'A' ) == GLFW_PRESS) { camera.Position -= Cast (right * moveSpeed, 0.0f ); } if (glfwGetKey (window, 'D' ) == GLFW_PRESS) { camera.Position += Cast (right * moveSpeed, 0.0f ); } if (glfwGetKey (window, 'Q' ) == GLFW_PRESS) { camera.Position += Cast (camera.Up * moveSpeed, 0.0f ); } if (glfwGetKey (window, 'E' ) == GLFW_PRESS) { camera.Position -= Cast (camera.Up * moveSpeed, 0.0f ); } if (glfwGetKey (window, 'J' ) == GLFW_PRESS) { camera.Direction = Vector3f ( camera.Direction[0 ] * cos (rotateSpeed) - camera.Direction[2 ] * sin (rotateSpeed), camera.Direction[1 ], camera.Direction[0 ] * sin (rotateSpeed) + camera.Direction[2 ] * cos (rotateSpeed) ); camera.Up = Vector3f ( camera.Up[0 ] * cos (rotateSpeed) - camera.Up[2 ] * sin (rotateSpeed), camera.Up[1 ], camera.Up[0 ] * sin (rotateSpeed) + camera.Up[2 ] * cos (rotateSpeed) ); } if (glfwGetKey (window, 'L' ) == GLFW_PRESS) { camera.Direction = Vector3f ( camera.Direction[0 ] * cos (-rotateSpeed) - camera.Direction[2 ] * sin (-rotateSpeed), camera.Direction[1 ], camera.Direction[0 ] * sin (-rotateSpeed) + camera.Direction[2 ] * cos (-rotateSpeed) ); camera.Up = Vector3f ( camera.Up[0 ] * cos (-rotateSpeed) - camera.Up[2 ] * sin (-rotateSpeed), camera.Up[1 ], camera.Up[0 ] * sin (-rotateSpeed) + camera.Up[2 ] * cos (-rotateSpeed) ); } if (glfwGetKey (window, 'I' ) == GLFW_PRESS) { camera.Direction = Vector3f ( camera.Direction[0 ], camera.Direction[1 ] * cos (rotateSpeed) - camera.Direction[2 ] * sin (rotateSpeed), camera.Direction[1 ] * sin (rotateSpeed) + camera.Direction[2 ] * cos (rotateSpeed) ); camera.Up = Vector3f ( camera.Up[0 ], camera.Up[1 ] * cos (rotateSpeed) - camera.Up[2 ] * sin (rotateSpeed), camera.Up[1 ] * sin (rotateSpeed) + camera.Up[2 ] * cos (rotateSpeed) ); } if (glfwGetKey (window, 'K' ) == GLFW_PRESS) { camera.Direction = Vector3f ( camera.Direction[0 ], camera.Direction[1 ] * cos (-rotateSpeed) - camera.Direction[2 ] * sin (-rotateSpeed), camera.Direction[1 ] * sin (-rotateSpeed) + camera.Direction[2 ] * cos (-rotateSpeed) ); camera.Up = Vector3f ( camera.Up[0 ], camera.Up[1 ] * cos (-rotateSpeed) - camera.Up[2 ] * sin (-rotateSpeed), camera.Up[1 ] * sin (-rotateSpeed) + camera.Up[2 ] * cos (-rotateSpeed) ); } }
总结 这个渲染器还有很多设计不合理的部分,比如我没有用到裁剪空间中通过w剔除片元的方法,我也惊讶于片元着色逻辑中算法恐怖的复杂度
而且现在如果把相机离近了物体就会非常卡,说明还有很多优化的空间
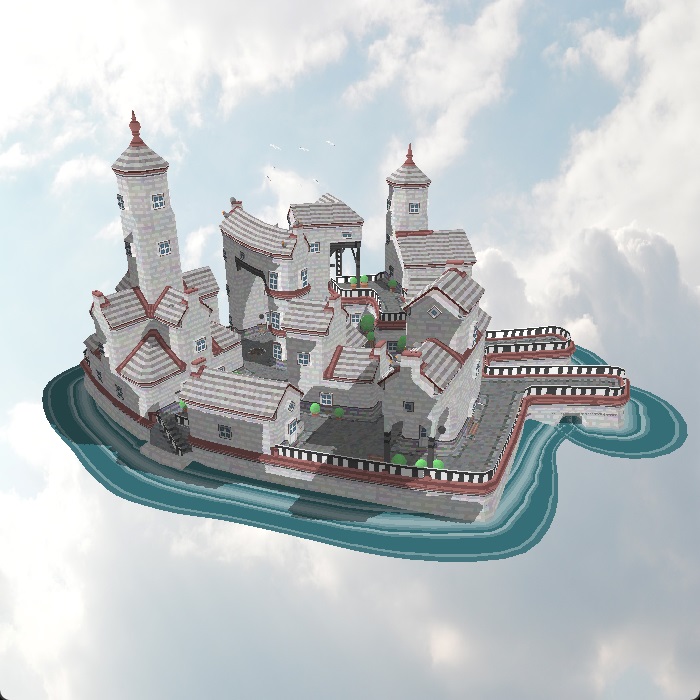
以下是成果展示
工程链接:https://github.com/Pditine/PurpleFlowerRenderer
视频演示:https://www.bilibili.com/video/BV1Jy411i73D/?vd_source=4ec457bb4f6cbb496da2800adbe93b46